Did you know that it is Hello Kitty’s 50th anniversary? That little kitty has been around a long time! Today I am showing you how to make this cute little Hello Kitty applique. I made a gift bag with it, but the options are pretty limitless. This particular gift bag went to a girl who has renamed herself “Hello Kitty Star,” so I thought it was fitting. I also love how the gift bag is part of the gift. Every little girl I know loves bags and purses, so this will get a lot of mileage out of it. Hello Kitty Star also had the most amazing party, which I hope to show you soon. I don’t want to steal Vanessa’s thunder, so I’ll wait until she can post it first.
 First I want to tell you a quick story. Generally speaking I don’t mind my kids having “Character apparel” and toys but for some reason I don’t really love the Disney princesses. Last year when my son went to preschool nearly every little girl in his class had a Princess backpack. When it was time for my little cutie to pick her backpack, I was really pleased that I steered her toward Hello Kitty instead. I thought she would have an easier time keeping track of her things if it wasn’t the same as everyone else. Cut to the first day of school and the first three girls that got there all had a Hello Kitty backpack! Sometime I’ll have to count exactly how many Hello Kitty backpacks there are, but I think it is a lot! Apparently the tide has turned on the princesses. Oh well, I still think it is adorable!
Supplies:
Pellon Fusible Peltex for the cat face – available in the interfacing section at craft stores. Use a coupon or wait for a sale and score a good deal!
Pink felt for the bow
Black Felt for the Eyes
White Thread – to sew on the peltex
Black Thread – for the whiskers
Jewel/rhinestone or additional felt for the nose
Tote bag/favor bags – I got mine from Dollar Tree
Template: Download PDF HERE
Download SVG Files HERE
I’m going to do this tutorial in two parts. First is making the bow.
Bow Instructions
Step 1: Cut One strip of felt 1″ x 6″ and one strip of felt 1/2″ by 3″.
 Step 2. Hot Glue the ends of the 1″ x6″ together and overlap slightly. You could stitch this together as well.

Step 3. Fold the bow in half at the center. I liked how it looked if the glued seam was at the front. You can turn it whatever you think is best.

Step 4. Glue the end of the skinny piece of felt to the back of the bow.

Step 5. Wrap the felt around the bow and glue the end on the other side. Trim off the excess felt.

Now that the bow is complete, I’m mostly going to tell you what to do. I started taking pictures for a step by step, but it seemed overkill.
Constructing Hello Kitty
- Iron the Fusible Peltex head onto your bag according to the directions. I used it because it was fusible and I knew it would be easy to work with. I also had it left over from another project, so that is always a plus.
- Stitch around the outside of the head with white thread to secure the head onto your bag.
- Mark where you want your whiskers to go. I used a black colored pencil but I would recommend a sewing pen/marker that comes off.
- To mark the whiskers I cut out a second Hello Kitty Template and left the whiskers on. I made a slit in the paper along the whiskers and traced the length of the whisker directly onto the peltex and bag.
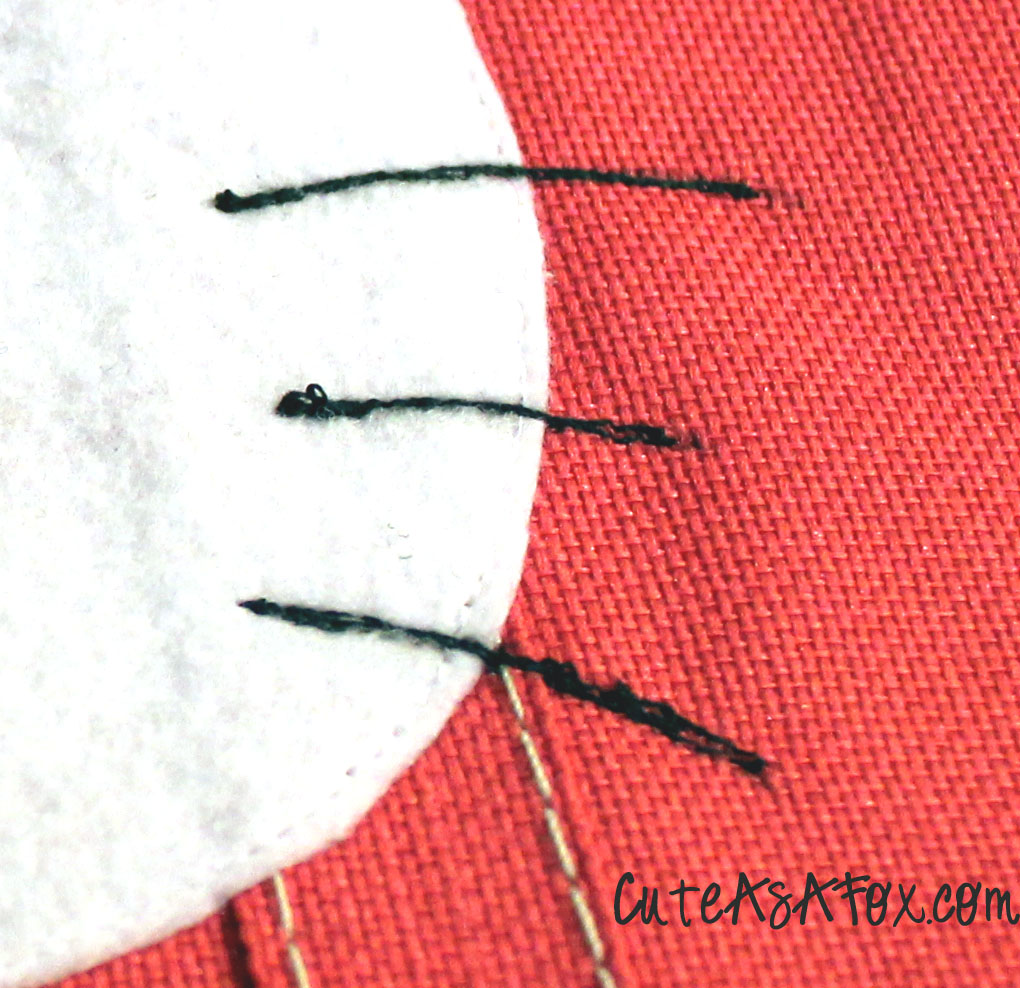
- Using black thread, sew several lines back and forth along the whiskers you marked. I went over the line two times. Here is a close up view of the stitching.

- Glue on your eyes, nose, and hair bow. I used E-6000 to attach the rhinestone nose I used. I used hot glue for the rest. You could stitch on everything but the rhinestone, however the speed of the hot glue was just too tempting for me this time.
 I also bought some party favor size bags from Dollar Tree for 2/$1. The bags are about 8″ by 8″ I knew my daughter would be really bummed if she didn’t get a Hello Kitty bag too. I don’t know what kind of material the smaller bags are but I did have some trouble with the whiskers. When I went to sewing just on the bag it pulled a bit because the fabric is relatively thin. You might want to size it down a little too, it took a lot of maneuvering to get the whiskers so close to the side seams on a small bag. You can see from the picture above that I did it fine, it just took some extra work to make it happen. Consider it fair warning!
Here’s the cost breakdown:
Bags – $1 or 2/$1 from Dollar Tree
Rhinestones – $1 for an assorted bag from Dollar Tree, or on hand
Felt – on hand
Fusible Peltex – on hand or $1-$2 at Joann’s with a coupon for a small amount.
Total: I only had to buy the bag for a $1, but it could be $3+ depending on what you have in your stash.
The birthday girl loved her bag, and I think they are really cute!
Here are the download links again…
PDF Template: Download PDF HERE
SVG Template: SVG Files HERE
I would love to see what you come up with using the template, so if you make something, send me a picture.


Sweet and practical bag.
Thank you so much for this post. I want to let you know that I posted a link to your blog in CBH Digital Scrapbooking Freebies, under the Page 3 post on Aug. 22, 2011. Thanks again.
Thank you for sharing
from Angelika from Digidesignresort.com
Absolutely adorable, you did a great job on your daughter’s Hello Kitty bag. Thanks for sharing with all of us at Sew Can Do.
Seeing as my blog is called Hello Kirsti I’m going to have to try this ASAP I think I’ll have much better sucess at applicque-ing Hello Kitty than I do ‘piping’ her on cakes… lol
Kirstin from http://www.Hellokirsti.com
How cute. Thanks for sharing this great tutorial!!
Looks awesome! Just a quick question… How does felt hold up in the wash? I’ve always wondered…
Thanks so much for taking the time for a great tutorial such as this one!!
I’d love for you to link up to our Crafts for Under Twenty Somethings party going on now until Saturday!!
Melanie
http://bearrabbitbear.blogspot.com/2011/08/crafts-for-under-twenty-somethings_24.html
I LOVE this! My girls adore anything Hello Kitty! I will most definitely have to make this! I would love to have you share this at my link party, Show & Share!
http://southernlovely.blogspot.com/2011/08/show-share-2.html
Adorable! Any little girl would be proud to carry all her goodies in this bag. Came over via Sundae scoop!
Awww how cute! I love hello kitty!!
Please feel free to link you Hello Kitty bag to my new Make Yourself Blog Hop!
-Jamie
For Love of Cupcakes
Soooo cute! I will have to try it.
This is such a cute idea. My 4 yr old is way in to Hello Kitty as are her preschool friends. This would be a great gift bag for their gifts and even better since they are reusable.
The initial spark for Kitty was a fortuitous confluence of events with the “inspiration and perspiration” that underpin every major invention. Sanrio President Shintaro Tsuji was initially “noncommittal” about the cat design. wall clocks