Come back tonight(12am EST) for the start of the $100 Visa Gift card giveaway!!
When we are creating our Rice Krispies Challenge recipes we always try to come up with some other Rice Krispies inspired recipes that fall in line with our theme. We are only permitted to submit four photos for judging, so sometimes our other treats don’t really make the final post. So today I am going to show you these Krispie Crunchy Bones I created as a part of our Halloween Rice Krispies Challenge. They taste a whole lot like a Nestles Crunch bar. Yum!
Supplies:
Ice Cube or Candy Molds – these came from the Dollar Tree and Target
Almond Bark or candy melts
Rice Krispies Cereal
Paint brush – keep a set of small brushes in my kitchen that are for food only.
Optional: Candy eyes, Mini M&M’s, food color spray in black
Directions:
1. Start with clean and dry molds
2. Melt some almond bark in the microwave. Paint a thin layer of chocolate over the whole mold. Thick enough that the details of the mold will be covered in chocolate but thin enough you can see the Rice Krispies through it.
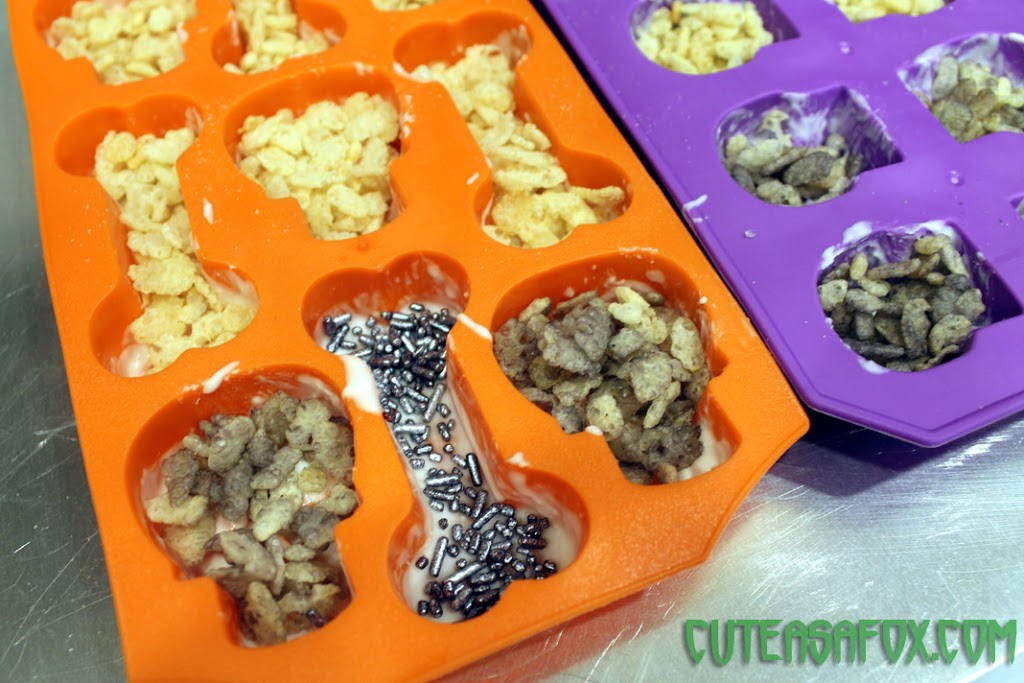
3. Add a layer of Rice Krispies cereal to your molds. I used plain and then I used Black color spray to color some of the Rice Krispies. It makes for a spookier skeleton when you are done.
 |
4. Spoon some melted almond bark over the Rice Krispies. Tap the mold against the counter to get any air bubbles out. Your should look about like mine below when you are done. If you watch while you are tapping, you can see little air bubbles popping up.
5. Pop them in the freezer for a few minutes to set up. Unmold your treats. I love the fleixibility of silicon molds. It makes getting these treats out very easy.
6. You can stop with step 5 or add some candies for eyes and dress up your skeletons a little more. I used some additional melting chocolate to glue on some mini M&M’s and edible eyes.
Here’s one more shot from the photo shoot. You can see our cute candy jars a little better.


Oh my gosh… This looks so good! Thanks for sharing the step-by-step tutorial on how to do this for people like me.
Those looks SO good! Great tutorial too!
WHAT AN ADORABLE TABLESCAPE. I LOVE EVERY SINGLE DETAIL. The bones are so cute. I love the candy jars I saw those on Pinterest, and want to make some myself. Your photos are outstanding. Great job. winks-jen
I have both of these molds but have never used either of them. Looking at the molds, I wouldn’t have imagined how fun they would look when filled with chocolate. I particularly like the skull from the orange mold. I’ll have to make some of these candies for this Halloween. So fun!
Totally cool. I pinned these so we can make them for our Halloween party!
Good morning!! You got a Saturday Shout Out over at Sassy Sites! Come on by and grab a button!! XOXO!
Yummy! I Love it!
This is so stinkin’ cute…and just cool as can be! I’d love it if you came over & shared it (and whatever else you have) with Makin’ You Crave Monday over at MrsHappyHomemaker.com!
I am so jealous of your skillz right now! That looks absolutely delicious! :o) So fun and perfect for Halloween!
Please feel free to link them up to my Make Yourself Monday blog hop!
For Love of Cupcakes
Great idea and tutorial! i will have it for Halloween. thanks.
Are you adding the melted marshmallow to the Rice Krispies or just pouring them in so they’re held together by the melted chocolate?
These look awesome! I have to pin them too!
So very cute. And they sound pretty tasty too. Thanks for the idea (for next year of course)